Countersinks and counterbores are extremely common features in the CNC machined parts we deal with on a daily basis at JS. Both are used to accommodate fastener heads, but their being interchangeable can have catastrophic consequences: A flush-driven screw that cannot go, or a bolt head with nowhere to go, which at best can prevent assembly, or worse, stress concentration or structural failure. The source of the problem usually lies in the improper selection of these two basic types of holes – countersinks and counterbores.
In simple terms:
- The countersink is the tapering “pit” for flat-head screws/bolts under which they can be “cammed down” in a snug fit, so that the top will be even with or below the workpiece surface after installation.
- A counterbore is a flat bottomed cylindrical step that is used to accommodate fasteners with raised heads, such as hex socket screws, in a manner that the head is nestled firmly inside without projecting.
The fundamental shape variation between them (cylindrical flat bottom vs. conical bottom) determines directly the type of suitable fasteners for it. Proper selection and use of these two hole types are essential to provide smooth assembly, secure connection, and avoid potential hazards. In this handbook, let’s study these two most critical hole types in detail.
Core answer:
They serve different types of fasteners and have completely different geometric shapes. To help you grasp the core differences in 3 seconds, please see the table below:
| Comparative dimension | Countersink | Counterbore |
| Geometry | Conical/V-shaped oblique face. | Flat bottomed cylindrical countersunk hole. |
| Primary use | Make the head of the flat head screw flush or slightly lower than the surface of the part. | Provide storage space for socket head cap screws or bolt heads. |
| Drawing symbol | ⌵ (a V-shaped symbol). | ⌴ (a U-shaped/square symbol). |
| Tool used) | Countersink drill bit. | Counterbore bit. |
| Application goal | Realize aerodynamic surface, prevent hooking, and enhance aesthetics. | Protect the bolt head, provide operating space for the wrench, and achieve a flat surface. |
This article will answer your questions:
- In this guide, we will thoroughly explain countersinks and counterbores.
- From understanding the annotation symbols on the drawing to how they are actually used, we will combine a real case to see what troubles can be caused by choosing the wrong hole type.
- The ultimate goal is clear: to help you accurately select the type in your design and do it right the first time.
Why Should You Pay Attention To These Hole Processing Suggestions? Because JS Avoids Costly Mistakes Every Day
We deal with drawings in the workshop every day, helping customers avoid pitfalls that may cost you more money. Take the cnc machining parts drawings with various precision holes that we deal with every day. Our engineering team has seen too many times that the design had to be reworked because the counterbore and countersink were confused. This mistake should not happen.
We at JS provide much more than basic custom cnc machining manufacturing services. One of our core values is to help you review the design drawings and analyze its manufacturability (DFM) for free. You know, an accurate CNC machining price is based on the fact that every dimension and every requirement on the drawing is clearly marked, so that we can accurately understand your intentions. This guide shares the core knowledge that has been repeatedly verified in our DFM process.
“Industry expert Mike Lynch (a well-known CNC programming expert) often says: Drawings are the language of manufacturing, and ambiguous language will inevitably lead to costly misunderstandings.”
Our suggestion is to explain the “basic language” of hole processing to you clearly, so as to reduce the possibility of misunderstanding and rework from the source.
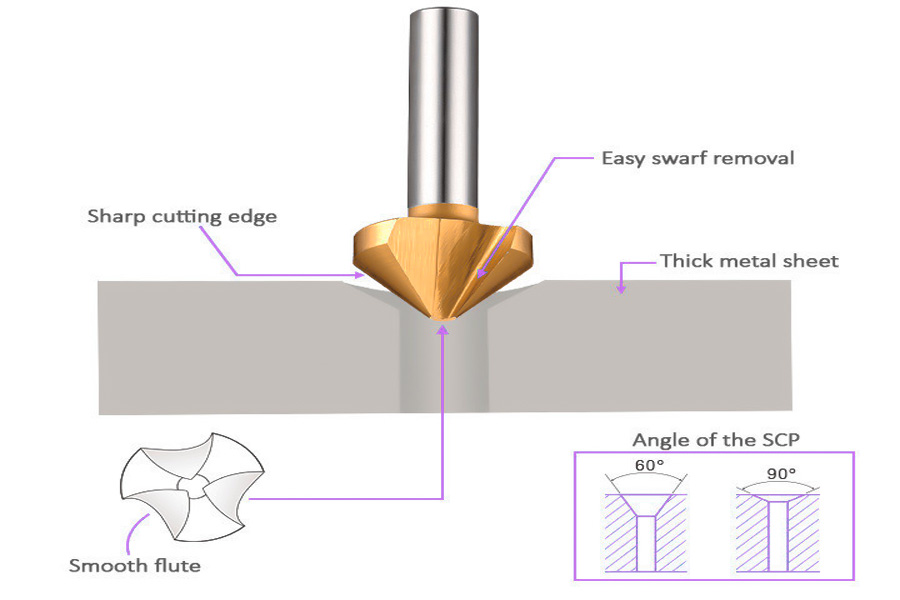
In-depth Analysis Of Countersink: The Art Of Tapering For “Flush”
Want to make the screw head perfectly “hidden” under the surface, without getting in the way or scratching your hands? This is the specialty of countersinks. It processes a tapered groove specifically to accommodate flat head screws or bolts, achieving a smooth and flat appearance.
Key point: Angle determines everything
(1) 82° angle: This is the “golden partner” of American standard/British standard flat head screws, the most common.
(2) 90° angle: Metric flat head screws usually use this angle.
(3) 100°/120° angle: More commonly used in thin plate connections such as aerospace, which can better disperse the force.
Where are countersunk holes used?
(1) Equipment housing assembly: Create a truly smooth, non-protruding outer surface, which is safe and beautiful.
(2) Woodworking and molds: Avoid the protrusion of the screw head to hook other things to ensure smooth operation.
(3) Quick deburring: Use it to “chamfer” the hole mouth to remove sharp burrs, which is simple and effective.
Choosing the right countersunk hole angle and depth is the key to ensuring that fasteners are installed flush and improving the appearance and functionality of the product. Next time you design, don’t just think about drilling, think more about this conical “small nest” and make sure it is clearly marked on the drawing. This can save you a lot of subsequent troubles. If you have any questions? Feel free to talk to JS!
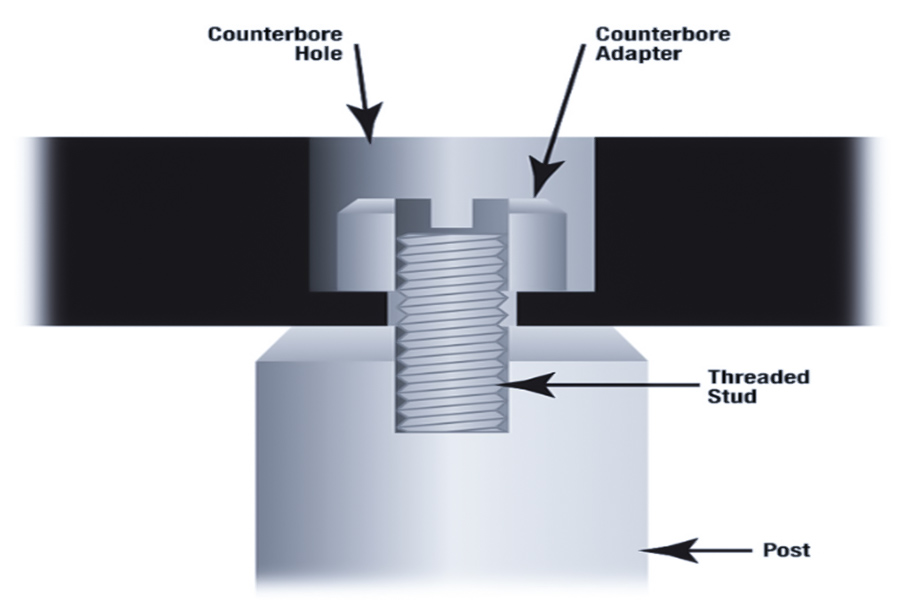
In-depth Analysis Of Counterbore: Flat Bottom Space For “Hiding”
When you need to hide the bolt head or nut completely below the surface of the part so that they don’t protrude and get in the way, counterbore is the solution you are looking for. Its key features are as follows:
(1) Flat bottom is the soul:
The most important thing about counterbore is that the bottom is flat. This flat bottom surface provides a “seat” for the bolt head or washer, allowing the clamping force to be pressed vertically and evenly without skewing, ensuring that the connection is stable and reliable. Imagine if the bottom is not flat, the bolt head is tilted under force, and problems are likely to occur over time or when the force is too large.
(2) Two-step processing:
Counterbore is never done in one step. It is always based on an already drilled through hole (this hole is called a guide hole), and then a special countersinking tool is used to expand the hole mouth to a certain depth to make that flat bottom step. Simply put: first drill a small hole to penetrate, and then “dig” a flat bottom pit at the entrance.
Typical application scenarios:
(1) Precision machinery: For example, if you want to hide the head of the hexagon socket screw, the wrench can be inserted to tighten it, and it can withstand a lot of torque, and the outside is flat and beautiful.
(2) Molds and fixtures: Here, the screws often need to be hidden tightly, and the screw heads cannot come out to scrape other moving parts or affect the positioning of the workpiece.
(3) Hydraulic/pneumatic systems (such as valve blocks): Used to place O-ring sealing grooves or plugs (screw plugs) so that the seals or plugs can sink and install, ensuring that the end faces are flat and reliable.
Counterbore is the structure that “hides” bolts and nuts with a flat step to ensure stable force. It is crucial to get the size and position of the countersink right when designing the drawings. Our JS handles various CNC machining parts with precision holes every day, and pays special attention to these details when doing custom CNC machining manufacturing. Not sure how to mark the counterbore? Send us the drawings, and we will help you check whether the design is reasonable for free to avoid errors in the subsequent processing, delaying time and spending more money.
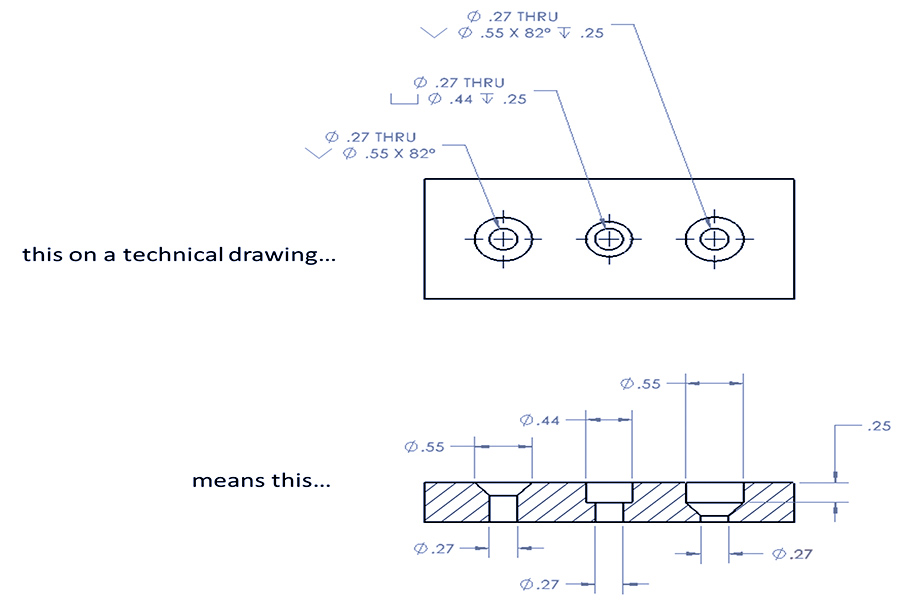
Drawing Language: How To Read And Mark Countersink And Counterbore Symbols
The countersink (⌵) and counterbore (⌴) symbols are marked incorrectly on the drawing. During processing, the countersink is either not drilled deep enough or the counterbore is drilled too large, and the screws cannot be installed on the parts in the end. When I find this kind of error when checking the drawing, I basically have to rework the entire batch. Asking one more question before processing whether the symbol is correct will save a lot of time.
Countersink (⌵ looks like an inverted triangle):
This is mainly to make the screw head flush or lower than the surface.
See the example: Ø.250 THRU | ⌵ Ø.500 X 82°.
It means: First drill a through hole with a diameter of 0.250 inches. Then “expand” a conical pit at the hole mouth. The upper diameter of this conical pit is 0.500 inches, and the cone angle is a standard 82 degrees (commonly used to place flat head screws).
Counterbore (⌴ like a square step):
It is to make a cylindrical step pit, usually to place a bolt head, washer or to sink a part.
See example: Ø.250 THRU | ⌴ Ø.500 ↧.200.
Meaning: First drill a through hole Ø0.25 inches, then machine a flat-bottomed cylindrical pit at the hole mouth, the pit is 0.500 inches in diameter and 0.200 inches deep (the ↧ symbol is the depth).
Key operation tips:
When drawing with CAD software (such as AutoCAD, SolidWorks), be sure to use the special countersink or counterbore feature tool in the software to generate symbols and annotations. Don’t just draw a shape yourself, the one automatically generated by the software meets the specifications, and the workshop master can understand it at a glance and is not easy to make mistakes.
Correctly identifying countersinks (focus on diameter and angle) and counterbores (focus on diameter and depth) is the basis for ensuring qualified parts processing. Engineers must use CAD’s standard feature tools to mark. Our JS company’s drawings are clear and standardized to ensure that production is successful once and reduce rework and scrap!
Ultimate Selection Guide: Which One Should I Use?
How to choose countersinks or counterbores? Don’t make it complicated. Just follow the ideas I usually help customers with and explain it in three points:
What screw head do you use?
- This is the basis! If it is a pointed flat head screw (such as common wood screws, some self-tapping screws), then you have to use countersinks.
- If it is a screw with a flat bottom head, such as a hexagon socket head screw or a hexagon bolt head, then the matching one is a counterbore.
What effect do you want to achieve?
- This is the key! The most important thing is that the surface is absolutely flat and smooth, without any protrusions. Countersinks are the first choice. The screw head can be completely hidden in the conical pit and feels flat.
- If you need a lot of force to tighten (high torque) and want to protect the screw head from being scratched or screwed, counterbore must be arranged. It provides a solid “seat” for the screw head, which is evenly stressed, easy to use and prevents breakage.
Is there enough space and is the material thick?
This is a realistic condition! Counterbore usually requires a deeper material thickness than countersinking to dig out the step. If the plate is too thin, counterbore may not be able to dig that deep, and forcing it will penetrate or lack strength. At this time, countersinking is often a more practical choice. Take a look at the requirements for minimum plate thickness in common standards to understand:
Countersink vs counterbore minimum plate thickness requirement reference
| Screw specifications (example) | Minimum plate thickness of countersunk hole (mm) | Minimum plate thickness for counterbore (mm) | Key Differences |
| M4 | ≈ 2.0 | ≈ 3.5 | Counterbore requires thicker material support. |
| M6 | ≈ 3.0 | ≈ 5.0 | Counterbore requires thicker material support. |
| 1/4″ | ≈ 2.5 | ≈ 4.5 | Counterbore requires thicker material support. |
Source: Comprehensive ASME B18.3 standard recommended values and industry general design experience
Look at the screw head → determine the hole type, choose a countersink if it is flat, and choose a counterbore if it is strong. Finally, measure whether the thickness of the board is enough to dig a counterbore! Can’t make up your mind? Send the drawings at any time, and our JS engineers will help you check, choose the right hole, and assemble smoothly!
Case Analysis: How A Symbol Error Leads To A Loss Of $5000
I encountered a real example last week, a symbol almost made the customer lose $5000! Share it with you:
Project background: A company that makes medical equipment designed an aluminum panel (thickness ~5mm), which needs to be fixed with M4 hexagon socket screws. On the drawing, a 90° countersink is marked. This is the problem!
Problems JS found during DFM analysis:
- It’s wrong at first glance! Flat screw head + conical countersink = fatal mismatch.
- The flat bottom of the hexagonal cylindrical head cannot form effective contact with the conical surface of the countersink.
The consequences are serious:
(1) Contact area collapse: The screw head only contacts the top of the cone with a very small point/line
(2) Clamping force failure: Unable to provide reliable preload, the screw is very easy to loosen.
(3) Local stress disaster: Huge stress is concentrated in a tiny area at the top of the cone, far exceeding the yield strength of aluminum.
Assembly/functional failure: The panel cannot be tightened, the key functions of the equipment are lost, and even safety accidents may occur (serious consequences for medical equipment).
How did JS save the situation?
Immediately called the customer to communicate clearly why it didn’t work, and quickly provided a modification plan: Change the 90° countersink to a standard M4 Counterbore. Counterbore is a straight-walled flat-bottomed pit that perfectly matches the flat-bottomed screw head and is stable under force.
Quantitative comparison of failure modes
| Risk indicators | Wrong design (90 ° countersunk hole+M4 hexagon) | Correct design (standard counterbore+M4 hexagon) | Differences and risk levels |
| Theoretical contact area ratio | ≤ 15% (point/line contact). | ≥ 90% (complete surface contact). | ↓85% (extremely high risk). |
| Local contact stress (Al) | ≥ 450 MPa (far exceeding 6061-T6 yield strength~240 MPa). | ≤ 80 MPa (safe range). | ↑ 460%+(inevitable failure). |
| Estimation of clamping force loss | >75% (ISO 898-1 torque clamping force model). | < 8%. | Loss of operational reliability. |
| Potential failure consequences | Hole crushing, thread detachment, assembly failure, equipment malfunction, batch scrapping. | Stable connection to meet functional requirements. | $5000+direct loss/batch. |
Data source: ISO 898-1:2013 Fastener Mechanical Properties Calculation Model, Aluminum Performance Based on ASM Handbook Vol. 2
Outcome and Value:
The customer adopted the correction plan, and the risk of $5,000 in scrap was successfully intercepted! This batch of aluminum panels was finally perfectly landed through our online CNC machining services. You see, this is the value of our DFM. Before programming and machining, the savings are all real money!
The difference between countersink and counterbore is a word, and the consequences are very different! Be more careful when designing drawings, or send them directly to our JS for a professional online DFM analysis. Spend a little money to prevent big losses and ensure that your parts are done right the first time and assembled smoothly! Please send your drawings, and JS will help you check!
Beyond The Basics: What Are Spotface And Counterdrill?
We understand countersink and counterbore, which is considered to be an entry point. But if you want to go deeper, you have to master their two “close relatives”: Spotface and Counterdrill. It can make design more accurate and manufacturing more efficient.
Spotface: A simplified version of countersinking
In short, it is a very shallow countersink (depth is usually ≤1-2mm), which processes a small flat area on the surface of the substrate.
Why use it?
It is not mainly to hide the screw head, but to create a local high-precision load-bearing surface. Especially when the surface of the part is a rough casting, forging, or a little uneven, directly screwing the nut or putting a washer, the contact is not good, and the force is uneven. Spotface mills a small plane locally, allowing the nut or washer to sit on it and transmit the force evenly.
Typical scenarios: Engine cylinder mounting surface, large structural parts connection.
Counterdrill: Process integration efficiency solution
This word is more inclined to describe a processing process or tool. Its goal is to use a knife or a process to drill a combination hole, usually a small hole (through hole or blind hole) at the bottom, and a larger countersink or countersink on it.
Core purpose: Improve efficiency and ensure coaxiality. Avoid traditional step-by-step drilling, such as drilling the bottom hole first and then changing countersink drill bits to make the taper surface, which will cause tool replacement errors and time loss.
Typical applications:
- Prepare holes for rivet heads (bottom hole through, top countersink to accommodate rivet heads).
- Stepped holes that require strict coaxiality (such as locating pin holes and lubrication channels).
Spotface overcomes the problem of rough surface support, and Counterdrill achieves efficient processing of stepped holes. The four have their own responsibilities, and choosing the right solution directly improves structural reliability and manufacturing results. Take action now: Submit your part drawings and working conditions requirements to the JS online platform, and our engineers will match the optimal hole type solution for you!
FAQ – All Your Questions About Hole Processing
What is the difference between countersinking and countersunk?
Countersinking refers to the process, which is the manufacturing action of cutting a conical depression in the material using countersink drill bits or other tools. This is the operation you are performing.
Countersunk refers to the result state or design feature, which describes the existing countersunk hole on the part, or refers to the design of the screw head as a cone (such as a countersunk screw) to be embedded in the countersunk hole. This is the attribute or shape of a specific fastener after the processing is completed.
Core distinction: countersinking defines the processing behavior, countersunking defines the result state or matching fastener geometry.Using them accurately avoids ambiguity in process documents and drawing annotations.
Can I use a large drill bit to make a simple countersink?
It is strictly forbidden to use standard drill bits instead of countersunk processing.
The geometry of standard drill bits (usually with a top angle of 118° or 135°) does not match the commonly used countersunk screws (such as 82°, 90° or 100°). Forced use will lead to:
- Contact surface deformity: The screw head only contacts the hole wall at the edge.
- Stress concentration: The local pressure far exceeds the yield limit of the material, causing the hole mouth to collapse.
- Clamping force failure: The preload loss exceeds 70%, and the connection is bound to loosen.
Special countersink drill bits with matching angles must be used to ensure full cone fit and reliable assembly.
In the quotation, which is more expensive, countersink or counterbore?
When our JS company does hole processing, customers often ask which is more expensive, countersink or counterbore.
In fact, the cost of these two types of processing is usually similar, because they are both additional processes after the main hole is completed. How much the final price difference is depends mainly on the number of holes you want to process, the size, and the strictness of the tolerance requirements, not on whether the hole itself is countersink or countersink. Don’t worry, the CNC machining price we give you will calculate the cost of all these processes clearly.
Summary
Choose countersink or counterbore? This is by no means a random aesthetic choice, but a key engineering decision that directly affects the function and reliability of mechanical assemblies. Mastering their differences and application scenarios is essential knowledge for engineers and designers.
Don’t let details hinder success: A seemingly small hole feature that is improperly designed may cause the entire assembly to be blocked or even fail. Your project deserves accuracy in every link.
Professional team, precise control: Submit your design (CAD file) to us. After uploading, our industry-leading DFM analysis system will immediately perform intelligent analysis and automatically identify potential design risks of key features such as countersinks and counterbores.
Engineer review, double guarantee: After the system’s initial screening, the experienced JS engineer team will conduct a manual in-depth review to ensure that your design avoids manufacturability issues and cost traps before entering production.
Transparent and efficient, value guarantee: Before you get the final and clear CNC machining price, we have proactively eliminated risks for you. Choose JS to make your custom CNC machining manufacturing project more efficient and reliable. Upload your drawings now and let us escort you!

Disclaimer
The content of this website is for reference only. JS series expressly disclaims any representations or warranties, express or implied, as to the accuracy, completeness or validity of the information provided. Any performance parameters, geometric tolerances, design features, material specifications or processes mentioned should not be considered as any commitment or guarantee by JS for products offered by third-party suppliers or manufacturers on its network or other channels. Buyers seeking quotes for parts are responsible for confirming their specific needs and product suitability. If you have any questions or need further information, please contact JS directly.
JS Team
JS is an industry-leading companyFocus on custom manufacturing solutions. We have over 20 years of experience with over 5,000 customers, and we focus on high precisionCNC machining,Sheet metal manufacturing,3D printing,Injection molding,Metal stamping,and other one-stop manufacturing services.
Our factory is equipped with over 100 state-of-the-art 5-axis machining centers, ISO 9001:2015 certified. We provide fast, efficient and high-quality manufacturing solutions to customers in more than 150 countries around the world. Whether it is small volume production or large-scale customization, we can meet your needs with the fastest delivery within 24 hours. chooseJS TechnologyThis means selection efficiency, quality and professionalism.
To learn more, visit our website:jsmachining.com
Resource

Pingback: Why Is Investment Casting Good? - JUSHENG
Pingback: 304 Vs 316 Stainless Steel: Who Is More Expensive? - JUSHENG
Pingback: Choosing The Right Aluminum: Comparison Of Material 6061 Aluminum And 6063 Aluminum - JS Precision